Procedures
Service Position
Special tools, testers and auxiliary items required
• Guide rod (T 10093)
• Torque wrench (V.A.G 1331)
• Torque wrench (V.A.G 1332)
• Adapter (T10467)
Service Position, Implementing
- Remove front bumper cover. Refer to => [ Front Bumper ] Front Bumper.
- Disconnect the connector from the headlamp.

- Remove the bolt - 1 - and - 3 - from the headlamp.
- Remove the bolt - 2 - and - 4 - from the support.
- Remove the left headlamp and support carefully toward the front.
- Remove the right headlamp as described.
Disconnecting the pressure hose on vehicles with a charge air cooler
- Open the clamp - 1 - in - direction of arrow a -.
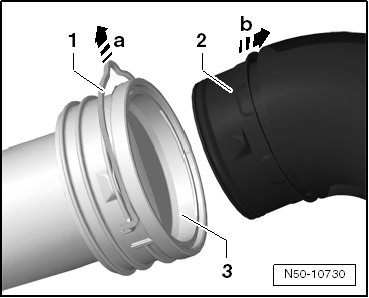
- Remove the pressure hose - 2 - from the coupling - 3 - in - direction of arrow b -.
- Disconnect the cable from the cable coupling. Refer to => [ Hood Cable, Disconnecting and Connecting ] Hood Cable, Disconnecting and Connecting.
- Support the hood and remove the support rod from the hood.
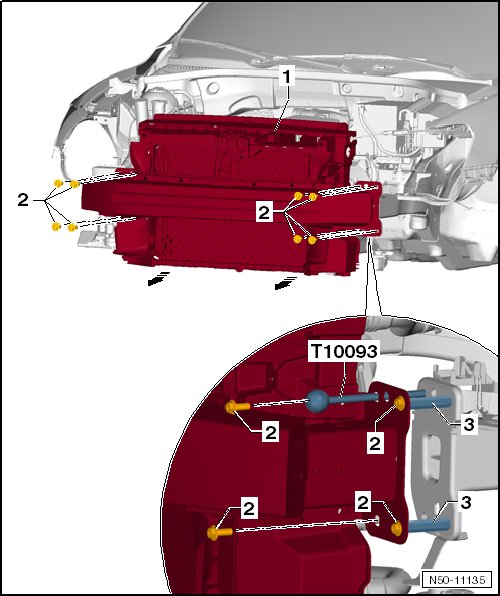
- Remove only one bolt - 2 - from the left and right longitudinal members.
- Install a guide pin (T 10093) into the holes in the left and right longitudinal member where the bolts were.
- Remove the remaining bolts - 2 - in the left and right longitudinal members.
- Pull the lock carrier and attachments - 1 - forward approximately 10 cm on the guide rod (T 10093) - arrows -. Be careful of the wires on the lock carrier. Disconnect the connectors if necessary.
- Install the adapter (10467) - 3 - on the left and right side between the bumper carrier and the longitudinal member.
Service Position, Resetting

Perform the following:
- Remove the adapter (10467) on the left and right side between the bumper carrier and longitudinal member.
- Push the lock carrier and its attachments - 1 - onto the guide rods (T10093) on the longitudinal member.
- Install the bolts - 3 -.
- Align the lock carrier and its attachments - 1 - on the longitudinal members and between the fenders.
Bolt tightening specification - 4 -, refer to => [ Lock Carrier Assembly Overview ] Lock Carrier Assembly Overview.
Install in reverse order of removal.
• Make sure the charge air cooler pressure hoses are secure
• Hoses and lines must not be pinched.
Locking the pressure hose on vehicles with charge air cooler
• Make sure the clamp - 2 - is on top.
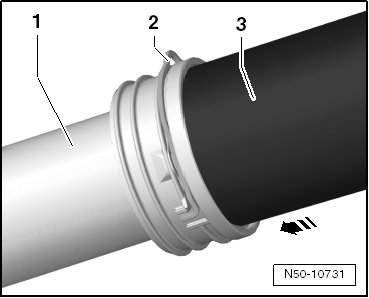
- Attach the pressure hose - 3 - into the coupling - 1 - in - direction of arrow -.
- Push the clip - 2 - all the way down.
• If the clip cannot be pushed all the way through, this means the pressure hose is not completely attached to the coupling.
• Install the pressure hose again and lock the clip.
• Pull the coupling to make sure it is secure.